Converting movies to Video CD or Super Video CD
This tutorial was originally published in December 2005 and is considered outdated.
Since then, quite a lot of software applications can achieve what this tutorial teaches in a more user-friendly and simple way, with at least the same degree of quality.
Contents
Introduction
Doctor Smith is a special guest at a medical conference, he's there to teach young doctors new techniques and ways to cure people. He has recorded his presentation and wishes to send it to a few hospitals in his area.
John has to go on a business trip, he wants to entertain himself during the flight. He wants to watch some movies on his portable video player.
Both people, fictional or not, have about the same problems. John needs to store the videos in a simple, basic format that a portable video player would easily understand and play. Doctor Smith needs to send the video from the conference to people that have computers in various configurations. He can't take chances and send the video in a format that a doctor with a Mac couldn't see. He also has to consider the fact that some doctors have slow, old computers, not capable of playing high resolution, highly compressed videos.
They both need a standardized video format that would run on almost operating systems, that would be fast enough to play on a portable video player of old computers. They don't need the quality of a DVD or the quality that a modern video codec would achieve.
At this moment the best standard for their needs is the Video CD or the better, less popular Super Video CD standard.
There are plenty of very easy to use applications that are designed for this purpose, to convert a video file to a Video CD or a Super Video CD but do you really have control over the quality of the output? Most applications try to reduce the quality of the output video file, in favor of speed, because usually people are not patient.
In this tutorial, you will learn how to create your own Video CD's or Super Video CD's, using a couple of free, professional applications, aiming for the best quality possible. You will also learn how to add subtitles to the video, if desired. The learning curve is a bit steep but once you get the idea, everything will be easy, guaranteed.
Let's move on and see what we are going to work with.
The Tools
In this tutorial we're going to use just two applications and an optional third one.
The open source application is a linear video editor, we're going to use it to prepare everything for the video encoder, the second application we're working with.
The application that converts the video in the Video CD format is specialized to do just that and works perfectly if it receives the video in exactly the right specifications for the desired conversion format.
The encoder has some basic processing functions that prepare the video but it makes more sense to leave these tasks to a specialized, fast, professional application like VirtualDub. It resizes the video, converts the frame rate, allows you to add subtitles to the video with the help of a plugin and, in the end, with the help of the integrated Frame Server, passes the video file to the video encoder.
You can download VirtualDub from VirtualDub's Downloads Page.
The Tsunami MPEG Encoder is considered by lots of people the second best MPEG encoder in the world, after Cinema Craft Encoder.
MPEG is the compression algorithm behind the Video CD format and MPEG 2 is the compression algorithm used by the Super Video CD format.
While the first best encoder is somewhat expensive, Tsunami MPEG Encoder's Video CD and Super Video CD encoding sections are free, you only have to pay if you wish to encode videos in the DVD format.
The MPEG encoder will receive the already processed and prepared video file from VirtualDub through its frame server and will do it's magic, converting the movie in the MPEG or MPEG v2 formats.
You can download Tsunami MPEG Encoder from Tsunami MPEG Encoder's Download Page.
- VobSub (optional)
VobSub is a collection of small application and plugins designed to offer support for subtitles.
From the whole package, we're going to use just one plugin designed for VirtualDub that lets us insert subtitles in the video. Because the original Video CD standard has no subtitle support, the subtitles have to be written directly on the image, a process also called "burn-in".
You only have to download this application if you plan to use subtitles in your projects.
You can download VobSub from AfterDawn's VobSub Download Page.
Installation & Configuration
Tsunami MPEG Encoder and VirtualDub are very easy to install, in fact all you have to do is to download the archives from their sites and extract the contents in two folders on your drive. It's recommended to create a dedicated folder for you tools, for example create a folder called Projects on your C:\ drive.
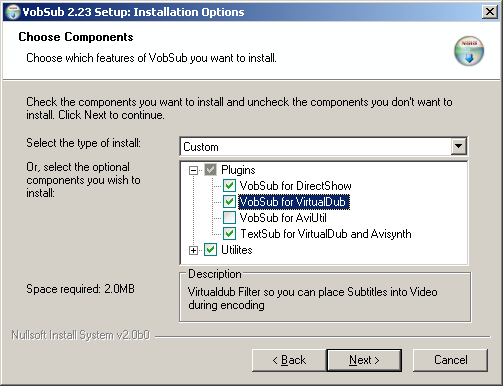
If you plan to use subtitles in your videos, you will need to download VobSub and install it. During the setup sequence, make sure that the "VobSub For VirtualDub" and "TextSub for VirtualDub and AviSynth":
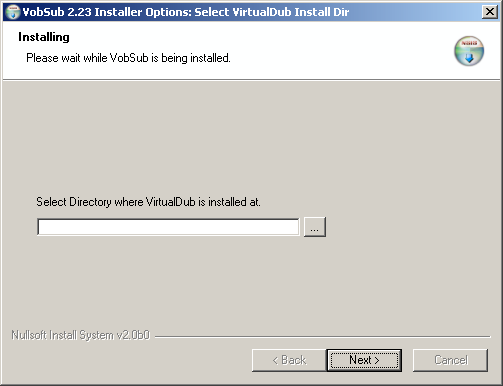
A few steps further in the setup sequence you will be asked to specify where VirtualDub is located, browse and select VirtualDub's folder, than click Next and the installation will be complete:
The last thing we have to do is to install VirtualDub's frame server. The frame server is a driver that tricks applications into believing that a special file created by VirtualDub is a video file. This way, we can instruct VirtualDub to resize, crop, add subtitles and various other effects on the video and send the result directly to Tsunami MPEG Encoder, without the need of saving a new copy of the movie on the drive.
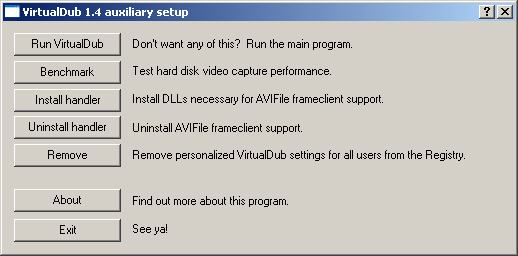
The frame server can be installed by double clicking on the application called AuxSetup, located in the VirtualDub folder. Click on the "Install handler" button and the driver will be installed:
Video Processing
Now that the applications are installed and ready to use, we need to determine some information: the video resolution and frame rate.
Each video file has a width, height and frame rate - the number of pictures shown on the screen in one second. The resolution and frame rate of our video file can vary but, if we want to convert to Video CD, the video needs to have a specific resolution and frame rate.
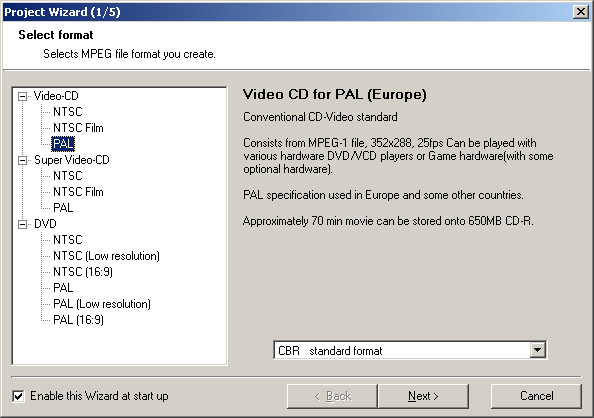
If we start Tsunami MPEG Encoder, the first page of a wizard will ask you to choose the conversion format.
In this tutorial, I will encode the video to Video CD, PAL because I live in Europe and the standard for TV in Europe is PAL, with some small exceptions. This means the movie resolution will have to be in the end 352x288 (width x height) and the number of frames in one second will have to be 25.
If you live in the United States Of America or other countries outside Europe, the NTSC profile may be more suitable. It has another resolution, 352x240 and 29.97 frames in a second.
However, most modern portable players have no problems decoding both NTSC and PAL, no matter what country you're in.
Please write down or memorize the resolution and frame rate as we're going to need these later. Click on Cancel and then close Tsunami MPEG Encoder.
Now that we know what resolution and frame rate our video has to be converted to, we need to know the resolution and frame rate of our movie.
Start VirtualDub and use the "Open video file" option from the File menu to open your movie.
If VirtualDub shows a message box about the sound of the video having a variable bitrate audio stream, we will have to decompress the whole audio track and replace the original audio track in the movie with the decompressed audio track.
The variable bitrate is a special method of encoding the audio information in the movie and VirtualDub doesn't like it.
For the moment, just click Ok. Later in the tutorial we'll go through the steps required to fix the sound.
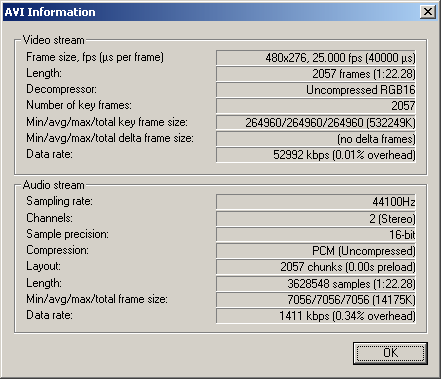
Once you see the video file in VirtualDub, select the "File Information" option from the File menu and you will see the following screen:
As you can see in the image, my video resolution is 480x276 and my video frame rate is 25. This means I will have to resize the video somehow to 352x288, the Video CD resolution defined in the standard, the PAL version. I won't have to change the number of frames per second because my movie already has 25 frames per second.
Go to the Video menu and select the "Full processing mode" option because we need to make changes to the video part of our movie.
The movie can be resized in VirtualDub using a filter called "Resize". Open the Filters window by selecting the "Filters" option in the Video menu. Then, click Add, select the "Resize" filter from the list and click Ok.
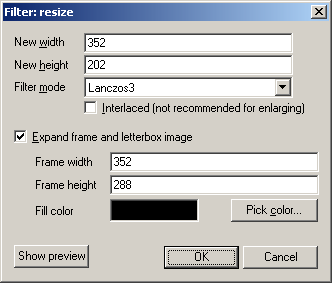
The filter's configuration panel will appear and you will be able to resize the video.
We can not resize directly to 352x288 because the video will be distorted, the aspect ratio will change. The new width and height must be proportional to the old values, that's why we'll use a simple rule:
If we know the original width and height and whish to resize the video to a new width, then the height equals is the division between the new width multiplied by the original height and the original width:
new height = ( new width * original height ) / original width
So, if my original width is 480 and my original height is 276, the new height will be :
x = ( 352 * 276 ) / 480 = 202.4
which means that in order to preserve the aspect ratio of the video, the new resolution should be 352x202, because the values are rounded to the closest number.
From the combo box available right below the two text fields, we can choose the resize algorithm available, from the lowest quality to the highest. The "Lanczos3" or "Precise Bicubic (A=0.60)" are the best resizing algorithms available.
In order to reach the desired resolution - 352x288 - we have to add black bars on the top and bottom of the frame so we will check the option called "Expand frame and letterbox image" and type in the two text fields the desired values, 352 and 288:
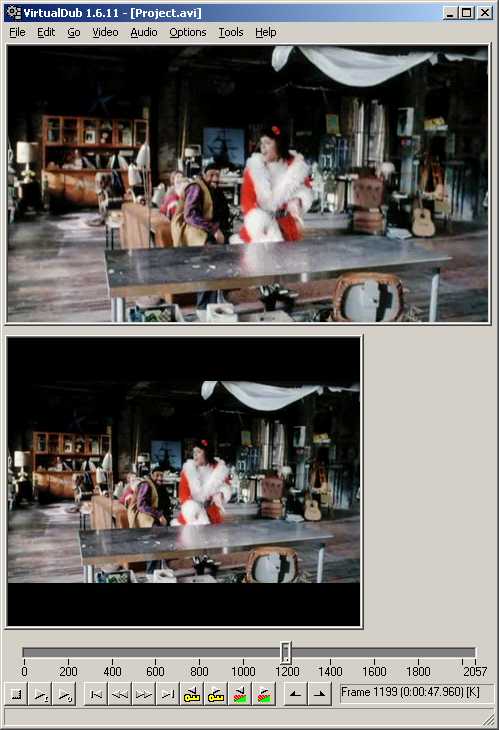
Click on "Show preview" if you wish to see how the video will look after the resize process or close the configuration panel and the Filters window, to see how the video looks in VirtualDub's window:
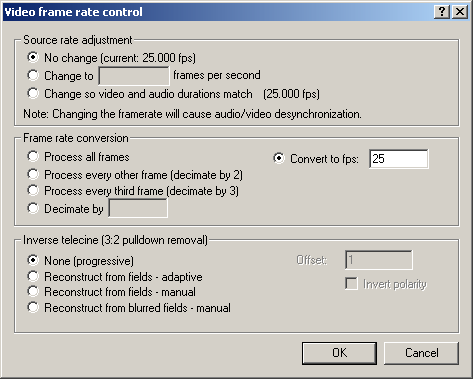
Now that our resolution is right, the next thing we need to take care of the frame rate. In my video, the frame rate is just right, I don't need to alter it.
If you do, select the "Frame Rate" option from the Video menu, click on the "Convert to fps:" radio button and then type the desired frame rate in the text box on the right:
Adding Subtitles
This step is optional
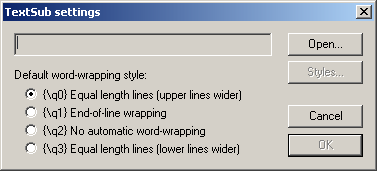
If you wish to add subtitles to the video, open the Filters window, scroll down to the end of the list and select the TextSub filter.
This filter lets us add subtitles to the video:
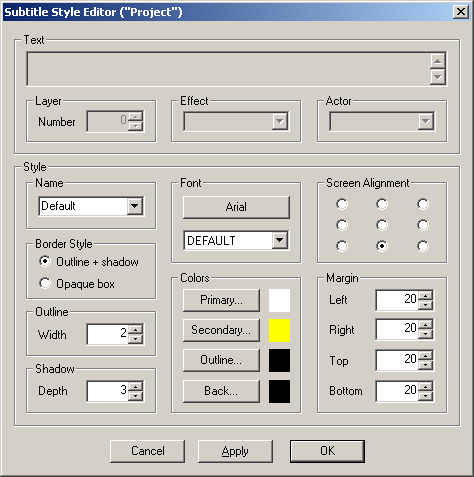
Click on "Open" to select the desired subtitle, then, only if you wish, click on "Styles" to change the subtitle text size, color, character set or lots of other options:
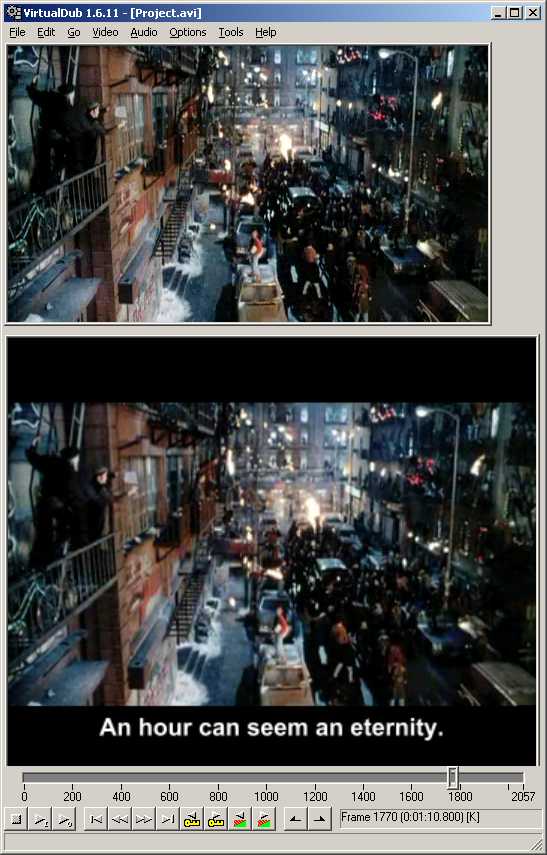
When you're ready, click on Ok to close the TextSub configuration panel, then close the Filters window and you will see the subtitle imprinted in the VirtualDub's output preview window (in this picture the output pewview panel is resized to 150%):
Audio Processing
I have mentioned at the start of the tutorial that VirtualDub has some problems with audio tracks encoded with variable bitrate.
If a message box appears complaining about the sound having variable bitrate, we have to make VirtualDub happy and process the audio track a bit.
We need to decompress the whole audio track on the drive and replace the original, variable bitrate track, with the decompressed track.
From the "Audio" menu, select "Full Processing Mode" to let VirtualDub know we want to process the audio track and not just copy it on the drive, as stored in the movie.
After the option is selected, select the "Compression" option from the same "Audio" menu, and make sure there is no audio codec selected.
Start saving the audio track in decompressed form by clicking the "Save WAV.." option from the "File" menu.
As soon as the process is completed, go to the "Audio" music and select "WAV audio..".
The last step is to go again to the "Audio" menu and select "Direct stream copy" because there is no processing required for the already decompressed audio track on your drive.
The Final Steps
We have prepared the video and audio parts of our movie, now it is time to send the prepared video file to our MPEG Encoder.
Before we do this, we need to make sure VirtualDub is configured to not encode the video or audio. There is no point to recompress the movie in another format because this will only slow down the MPEG encoder and lose quality.
Go to the Video menu, select the "Compression" option and select the first option in the list, "(Uncompressed RGB/YCbCr)".
Now we're finally ready to send everything to the Tsunami MPEG Encoder.
Go to the "File" menu and click on "Start frame server", you will see the following image:
The text in the text field is an unique identifier for your movie, it must not have any punctuation signs or spaces.
Click Start and VirtualDub will ask you to save the video file that will trick applications into believing they open a real movie. Type a name and add the ".avi" extension at the end of the file name.
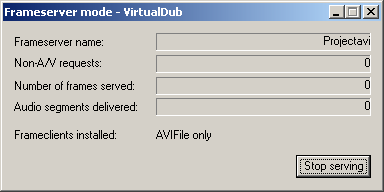
If you didn't forget to install the frame server at the start of the tutorial, you will see the following image after you click on Save:
This means VirtualDub is ready to serve images and audio to any application we want, as long as those application support the frame server driver.
We're now ready to encode the movie in Video CD format.
Encoding to MPEG
As soon as we open Tsunami MPEG Encoder, we see the wizard that helps us start encoding to the desired format.
In this tutorial, we have prepared the video to be encoded as Video CD, PAL version so I'll select that option:
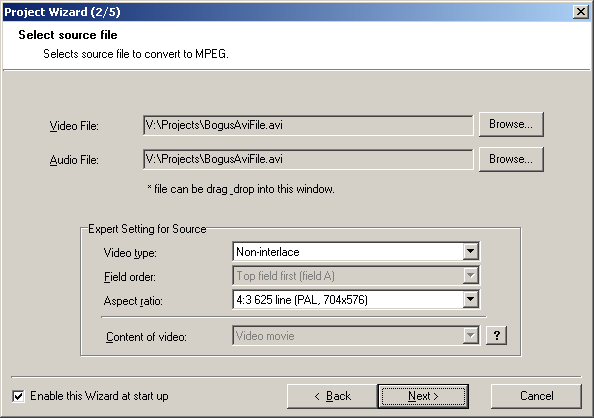
In the next step, click on first "Browse" button and select the video file created with the frame server, in my case "BogusAviFile.avi":
You will notice the audio file is automatically set to your video file, which is good because it speeds things up.
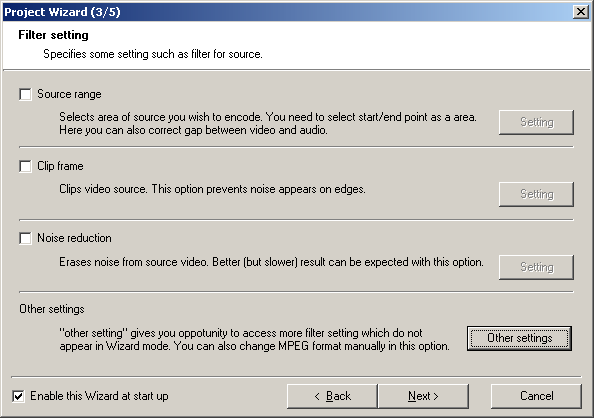
The next screen lets us perform some basic operations and allows us to fine tune the encoding process:
We don't need to encode just a range of the video and we don't need to cut the borders of the video using the "Clip frame" option but we can check the other settings that may improve the quality of the encoded file.
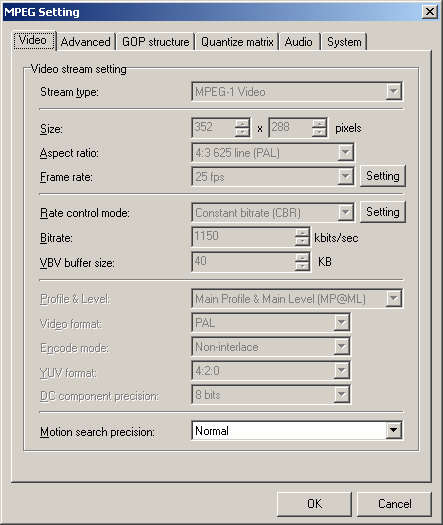
Click on the "Other settings" button, you will see the following window:
There are not too many options that can be changed because a video encoded with other settings will not follow the Video CD standard that we have selected at the start.
You can check the other tabs of the window and see what options there are but when encoding to a strict format such as Video CD the only option that you can easily change is the option called "Motion search precision".
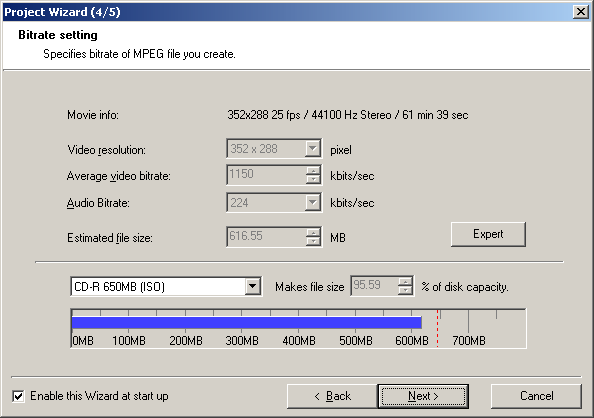
The next wizard window shows you how much space the encoded file will need.
On less strict formats such as Super Video CD or DVD, the video bitrate can be slightly adjusted so that the encoded file will fit exactly on the media you want to use.
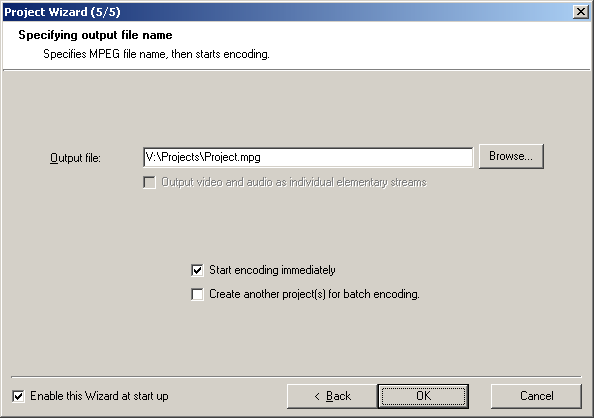
The last step of the wizard allows us to specify where the encoded file will be saved. If you leave the "Start encoding immediately" option checked, Tsunami MPEG Encoder will start encoding it as soon as you close the wizard by clicking Ok.
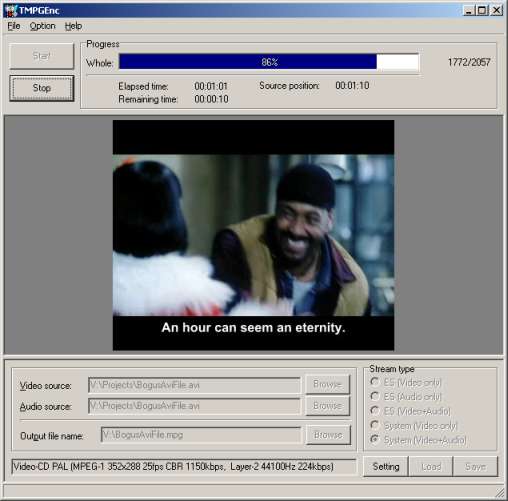
As you can see in the picture below, Tsunami MPEG Encoder can show a preview of the video but it is recommended to disable it for faster speed. You can do this from the menu called "Option", the option is "Preview option".
Conclusion
In this tutorial we have learned how to encode our movies into the Video CD or Super Video CD format, the only difference between these two beeing the resolution and frame rate.
The whole process may sound difficult or complicated but, as I said at the start of the tutorial, it's really easy once you manage to create a couple of Video CD's.
You will also see that the quality of the movie is far better than any file created with shareware or commercial programs.
I hope it's easy for you to understand. If there are any problems I'll gladly answer all your questions on the site's forum. As usual, any comments, good or bad, are much appreciated.
In this tutorial I have used video trailers freely available to illustrate the processing steps.
The purpose of this tutorial is to educate and help people learn new things, not to encourage piracy of any kind.
You should only use what you have learned to encode movies for your personal use only, if the laws in your country allow you to do so.
